As was foretold, we've added advertisements to the forums! If you have questions, or if you encounter any bugs, please visit this thread: https://forums.penny-arcade.com/discussion/240191/forum-advertisement-faq-and-reports-thread/
Options
I'm building a cabinet, and would like not to fail horribly [Update w/ pics]
Big Dookie Smells great!Houston, TXRegistered User regular
Smells great!Houston, TXRegistered User regular
As the title says, I will soon begin construction on a fairly large cabinet for one of our bathrooms we're renovating. I have done some light woodworking before, such as bookcases and cutting molding and stuff like that, but nothing of this scale. I know it's going to be pretty complicated, and so I'd appreciate some tips from all you skilled carpenters out there.
For reference, I mocked up what I'm generally planning on building in Google SketchUp. Here's a peek:
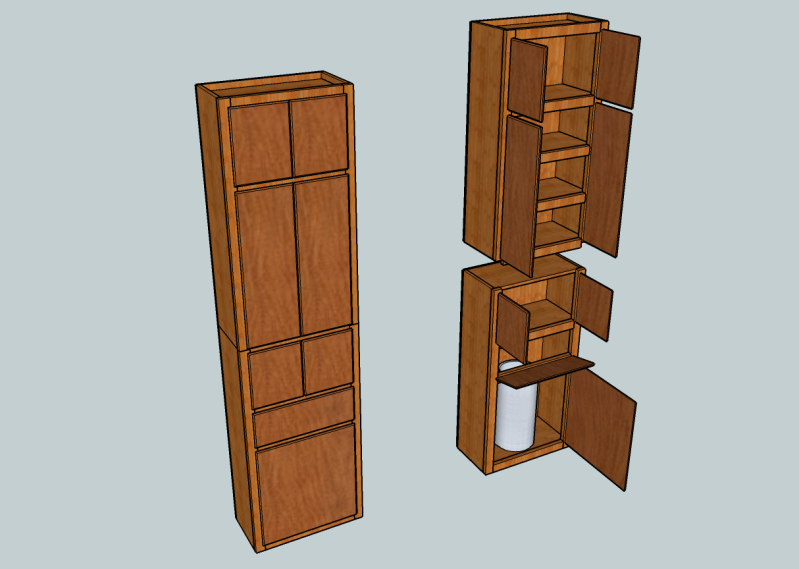
The plan is for it to go from floor to ceiling, which makes it 96.5 inches tall. Because of this, making one large unit seemed impractical, since it would be hard to get it into the bathroom and then wedge it into it's correct spot since there's no wiggle room. To solve this, I'm planning on building it in two sections as shown, and then once they are in place I will join them together. For those who are curious, the bottom section is for a laundry hamper. The hatch door will be connected to a chain and pull down, and a basket can be put in that section so you can throw your towels or clothes or whatever in there.
So does this plan sound feasible? What hang-ups can I expect to run into? Will dadoes and rabbets be necessary, or can I just nail the shelves directly where they're going to be placed? Any advice is welcomed and appreciated!
For reference, I mocked up what I'm generally planning on building in Google SketchUp. Here's a peek:
The plan is for it to go from floor to ceiling, which makes it 96.5 inches tall. Because of this, making one large unit seemed impractical, since it would be hard to get it into the bathroom and then wedge it into it's correct spot since there's no wiggle room. To solve this, I'm planning on building it in two sections as shown, and then once they are in place I will join them together. For those who are curious, the bottom section is for a laundry hamper. The hatch door will be connected to a chain and pull down, and a basket can be put in that section so you can throw your towels or clothes or whatever in there.
So does this plan sound feasible? What hang-ups can I expect to run into? Will dadoes and rabbets be necessary, or can I just nail the shelves directly where they're going to be placed? Any advice is welcomed and appreciated!
Big Dookie on
0
Posts
Not sure if you've decided on materials yet, but you can cut down a bit on cost by using plywood instead of hard wood (3/4" thickness for the frame, 1/4" for the back panel, and 1/2" or 3/4" for the doors). Just keep in mind that this will be in a bathroom and as such the amount of moisture will be greater than most other living areas. You're going to want to seal it with a clear top coat if you're staining it (if painting, the need for a top coat is less necessary depending on the type of paint used). A google search can help identify the right type for the environment and what to use depending on if you're staining or painting. If you're going to keep it flush against the wall, you may want to consider caulking the seams between the cabinet and the wall with a bathroom caulk to prevent moisture from accumulating behind the cabinet (from hot shower steam). Doing this has the added benefit of hiding any defects in the walls if they aren't completely square to begin with.
Depending on how the bathroom was remodeled, you may run into issues with the walls/floor not being square, but you can always shim the bottom to level the cabinet out if need be.
I'd highly recommend taking your sketch and adding dimensions - it will make cutting and construction so much easier if you've done all the math before you turn on any saws. There's nothing like trying to subtract a couple fractions in your head quickly and ending up with a piece of wood 1/2" too short :P...
Good luck - looks like a fun project!
Rysca
(recent wood projects of my own to act as credentials: www.flickr.com/rysca)
The plan is to place this cabinet in the corner of the bathroom, such that the sides of the cabinet you can't see in that sketch are actually against the back and side walls of the bathroom. Because of that, I probably will be bolting/screwing the cabinet into the studs in the wall once it's in place. I basically want it to be a permanent fixture in the bathroom. I will look into joint options based on your recommendations.
As for materials, I agree, I will probably be using a good quality plywood instead of hardwood since I'm on a budget. I didn't mark all the dimensions yet in my sketch, but I will. That said, I did use 3/4" boards for the sides and top/bottom of the carcasse, and then 1/2" on the back (that may be too much though, I'll likely go to 1/4" for the final project), with 1"x2" boards for the trim and 1/2" for the doors. That sounds pretty close to what you recommended, so that's good. We will likely stain all the pieces after they have been cut, then put the cabinets together, and then apply a polyurethane coat or two to them once they're installed in the bathroom. Does that sound good enough to combat moisture? I'll also take your advice on caulking everything.
Anyway, thanks again. I'll try and post an update once the project is finished. If anyone else has any other comments or suggestions, please feel free to leave them.
Oculus: TheBigDookie | XBL: Dook | NNID: BigDookie
1. You will have to attach it to studs in the wall - with screws - and putting them through 1/4" backing isn't going to cut it. You'll need strong 3"+ screws and you'll need to put them through a thick piece on the top and bottom of the cabinet to hold it in place.
2. You can't actually make the cabinet the exact height of the room or you won't be able to install it. If you want to make it look like it goes completely floor to ceiling (which looks a little weird IMO) install the cabinet and then put a false top on it.
http://woodworking.about.com/od/woodworkingplansdesigns/ss/cabinets.htm
That has some basics if you're looking.
Oculus: TheBigDookie | XBL: Dook | NNID: BigDookie
This is a view of the entire cabinet as one piece, from top to bottom. Sorry it's taken so far away, but it is a really tall cabinet and I had trouble fitting it all into the frame.
This a closer view of the top section of the cabinet. As you can see, it turned out pretty much exactly how I planned it, which was nice. The bottom section had some adjustments though...
As you can see, things didn't turn out exactly how I planned them here. Turns out I didn't measure the bottom shelf that would hold the laundry hamper correctly and made it too short. I still thought it would have worked, but my wife would have liked for it to be a bit taller, but by the time she saw it things were already built. However, we simply modified it so that we had a little open shelf for knick-knacks or whatever, and then a large open shelf on the bottom with double doors where you can still put in a laundry hamper or trash can. There just isn't a chute anymore for it, which is okay. I still liked how it turned out.
All in all, it was an interesting experience. I wouldn't say it was easy, but it was easier than I thought it would be, and fairly straightforward. I wouldn't mind doing another project like this in the future if the need arises.
Oculus: TheBigDookie | XBL: Dook | NNID: BigDookie
Didn't participate in the thread, but adding in my "Turned out awesome!"
Now we need someone to be the next Tim "The Toolman" Taylor and we'll have a PA man's sitcom.
3DS FC: 4699-5714-8940 Playing Pokemon, add me! Ho, SATAN!
Oculus: TheBigDookie | XBL: Dook | NNID: BigDookie