As was foretold, we've added advertisements to the forums! If you have questions, or if you encounter any bugs, please visit this thread: https://forums.penny-arcade.com/discussion/240191/forum-advertisement-faq-and-reports-thread/
Options
Repair old photo with Photoshop
Richard Registered User regular
Registered User regular
I recently found my grandfather's old driving license. It's 60 years old so the photo unfortunately has lots of cracks in it. Is there any way to use the magic of Photoshop to repair it? I understand there are limitations but any improvement would be welcome.
I found this guide on Youtube but even when trying different variations I couldn't get a good result.
The photo is available in higher resolution if anyone would like to take a shot at it themselves but I know my way around the basics of Photoshop so if anyone has a guide I would be happy to try it. (Image in spoiler)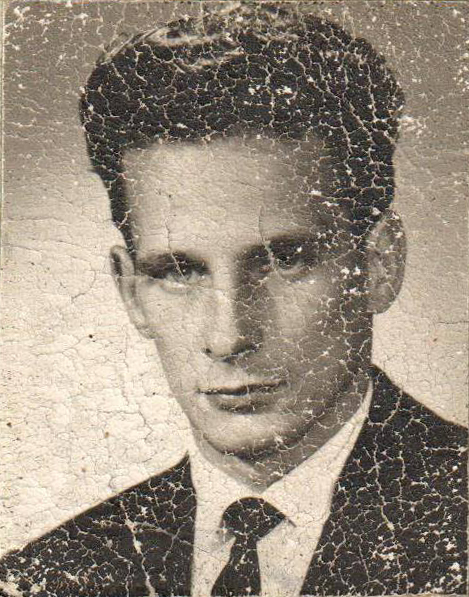
Grandfather bonus trivia
He passed away six months before I was born at the age of 50 so I have never met him. He was into photography, drawing and from what I have been told had a small acting role in a low budget sci-fi movie about aliens.
I found this guide on Youtube but even when trying different variations I couldn't get a good result.
 https://youtu.be/S1WJ2K5i0_8
The photo is available in higher resolution if anyone would like to take a shot at it themselves but I know my way around the basics of Photoshop so if anyone has a guide I would be happy to try it. (Image in spoiler)
Grandfather bonus trivia
He passed away six months before I was born at the age of 50 so I have never met him. He was into photography, drawing and from what I have been told had a small acting role in a low budget sci-fi movie about aliens.
Richard on
+1
Posts
I would use the patch and clone tools, with maybe just a pinch of soft brush here and there. The important thing will be to make sure you're keeping the values correct (light and shadow).
Good luck!
edit: and that's a driver's license photo to boot? Sheesh, better than most model's headshots!
You can try using the filters [Filter>Blur>Surface Blur] or [Filter>Noise>Dust & Scratches] to help you get a good base to work from, though these filters may blur out some of the hard edges and details you want to keep, so you may need to go back in and clean those areas up (the best way to do this in my opinion is to ALWAYS keep a layer with the original...you can bring back parts of it, especially for important detailed areas like the eyes).
Clever use of the "Lighten" and "Darken" brush modes will also help...as an example, colorpick the lightest part of the dark suit, and set your brush to "darker color". Then run your brush over all the cracks in the suit. The brush won't 100% hide all of them, but it also won't go over any details in the suit that need to be there (because you've selected the lightest color in the suit, and Darken tells Photoshop to just darken anything brighter than your selected color.
That would be a good method to take care of the suit, the background, and the shadowed areas of his hair. Any area with large sections that don't have any small detail in them.
Like I mentioned, it's not going to make the photo perfect yet, but for a photo this heavily damaged I think it's a really fast way to give yourself a solid base to work from. After this, it'll likely need some more elbow grease with you zooming in and painting things directly (which you can still do using Darken and Lighten, just on a smaller scale).
Always have the original on another layer so you can flip back and forth to ensure you're not introducing any new darks or lights in any area. Good luck!
@WiseManTobes I guess you didn't have to go to the DMV, stand in line and get your picture taken by a machine back in those days.