As was foretold, we've added advertisements to the forums! If you have questions, or if you encounter any bugs, please visit this thread: https://forums.penny-arcade.com/discussion/240191/forum-advertisement-faq-and-reports-thread/
Options
Help me paint digitally.
Chop Logic Registered User regular
Hey, I've been posting here for a while but in case you're not familiar with me at all, heres my flickr:
http://www.flickr.com/photos/gabrielyolk/
Heres my problem: I'm learning to paint right now, in oil paints. I've had a tablet for a long time, but always got frustrated whenever I tried to paint with it. Heres an apple I just did quickly (from a refrence) to illustrate my problem:
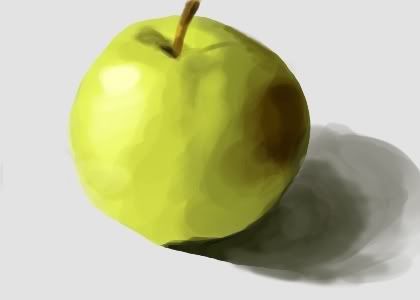
I can't get it to look smooth at all. Like on the right side, on the area where the dark shadow blends out, it looks all splochy and you can see all of the brushstrokes. When I paint with oil paints, I can just smooth this out with a fanbrush, but I have no idea what I'm supposed to do on this tablet. Right now my settings are:
-The pressure of the brush changes the opacity
-I'm using bigger ( ~20 pixel) hard edged brushes.
I've tried a lot of different things and nothing has really worked. If anyone can give me any tips or anything, I'd really appreciate it. Thanks a lot. I'll just be posting a lot of my digital stuff in here (even though it is god awful) because thats what I really want help on now.
http://www.flickr.com/photos/gabrielyolk/
Heres my problem: I'm learning to paint right now, in oil paints. I've had a tablet for a long time, but always got frustrated whenever I tried to paint with it. Heres an apple I just did quickly (from a refrence) to illustrate my problem:
I can't get it to look smooth at all. Like on the right side, on the area where the dark shadow blends out, it looks all splochy and you can see all of the brushstrokes. When I paint with oil paints, I can just smooth this out with a fanbrush, but I have no idea what I'm supposed to do on this tablet. Right now my settings are:
-The pressure of the brush changes the opacity
-I'm using bigger ( ~20 pixel) hard edged brushes.
I've tried a lot of different things and nothing has really worked. If anyone can give me any tips or anything, I'd really appreciate it. Thanks a lot. I'll just be posting a lot of my digital stuff in here (even though it is god awful) because thats what I really want help on now.
Chop Logic on
0
Posts
I've always found smoothing overrated though. I tend to skip it because the unfinished versions usually end up looking better.
Others select a smaller brush and just keep working on the area until the small strokes blend.
But I think smudging at certain opacities...
Ding! This is how to do it. You can also use Blur sparingly at certain points, but it's best to experiment with that a lot before you make regular use of it.
How you tackle a gradient is also highly dependent upon the material you're rendering and, in some cases, the particular style or mood. For human skin for instance, on a soft rendering of a young nude female, you would probably be busting out a large round brush with lowered opacity and a very soft edge at some point.
That splotchy, concentric ring-y looking effect you get from hard edges that have different opacity on top of each other is really ugly if it's too prominent, but conversely, over-blending everything can be equally detrimental to the end product. I think both mistakes are equally bad as "ubiquitous digital painting faux-paus". Part of this problem is alleviated when you graduate to using more complicated brushes that have their own texture and behaviors--it's a lot easier to make things seem less sterile and "digital". However, I still believe that sticking hard and fast to simple round brushes is the best way to learn until you can produce those effects manually.
There are many ways to blend, and frankly a lot of it comes down to your own individual preferences. Some people like to tweak flow and always use opacity at 100% while relying solely on flow adjustments and hand pressure. Personally, with most of my brushes I prefer to have opacity and flow set to pen pressure most of the time, and I will manually tweak opacity down depending on what I'm trying to do-- very subtle gradients might call for as low as 10 or 20% opacity. I use this in combination with my hand permanently attached to my alt-key to sample colors from within the area I'm blending. This is DIGITAL painting after all, and so in order to create a smooth gradient you basically have to occupy the space with many values that change gradually in order to create the illusion of a smooth shift. This is sort of hard to explain and frankly I doubt it will make much sense until you've figured it out for yourself anyway. I made a quick diagram explaining MY usual process because I like to waste time.
I do not use the Blur or Smudge tool at all, ever.
You should practice this in monochrome or grayscale paintings. To get a feel for how you want to tackle manual blending.
This exact same technique does not work in paintings with color, because you have to deal with hue shifts along a gradient in addition to value shifts
I guess I'll just have to practice a lot then. I'll probably try and work something out once I get home around 9 or so.
Just did this real quick, around 30 minutes. Looking at it now, I realize its way too saturated, and the ref. photo was on a grey backround. I rushed the shadow, but I used the blending method Scos described, and it works great, I'll just have to spend more time on something next time.
I guess rather than painting, as in getting digital art to look painted, I am trying more to learn coloring/lighting.
So far I just use the circular "fade out" brush at various sizes (as opposed to the "hard edge" brush). The only thing controlled by pressure is size, but I want to try it with opacity too - that would probably help a lot.
By the way, along the bottom edge of everything you can see the bluish tint; not the blue light reflection which is fairly hard, but the bigger gradient-esque tint along the bottom. That's basically supposed to imply more of the blue light from below. It may be incorrect, but I liked how it looked. Anyway, I did it by setting the layer on overlay. Is this a technique most digital artists use? What are the best uses of layer settings such as multiply and overlay? I've seen some use them for shadows, but is that just a cop out? Do the best guys actually paint everything by hand if possible, or are shortcuts like these still used effectively?
EDIT: I apologize for just jumping into this thread. I thought it looked appropriate for general digital art help, didn't mean for it to be a hijack. I'll clear out this post, Chop, if it's disruptive from your personal instruction.
I'm making a thread in a bit that will be more instructional.
Calm yourselves.