As was foretold, we've added advertisements to the forums! If you have questions, or if you encounter any bugs, please visit this thread: https://forums.penny-arcade.com/discussion/240191/forum-advertisement-faq-and-reports-thread/
Options
Maya Lesson 1 for Nightdragonz(s)
PROX Registered User regular
Registered User regular
Tutorial for those who got the personal learning edition! Basic setup and modeling your first rock! Huzzah!
Maya Lesson for Everyonedragonz(s)
1. Setup
-Use a wacom tablet, or your fingers will die.
-Set your pen buttons to right click and middle click
In Maya go:
-window->settings/preferences->preferences
Set it up this way:
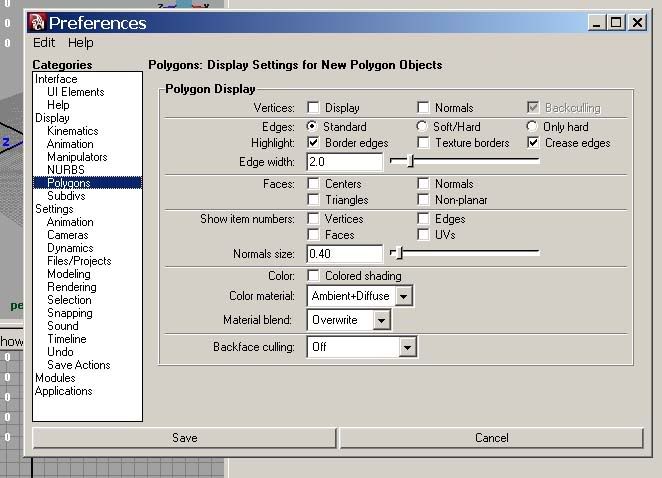
Then click save!
2.OKay now set your project folder
-Make a new folder
-File->Project->Set
-Choose a folder
-this file will now always look in that folder for models and textures.
3.Camera Basics
-Space Bar Expands the current window your mouse is over. Spacebar again to go back.
-Alt+Press with pen (Left Click) rotates your view
-Alt+Right Click=zoome in and out
-Alt+Middle Click= pan
-press 5 to enter shaded mode, so that you arent looking at wireframes all the time. press 4 to return to
wireframe mode
4. Polygon Basics
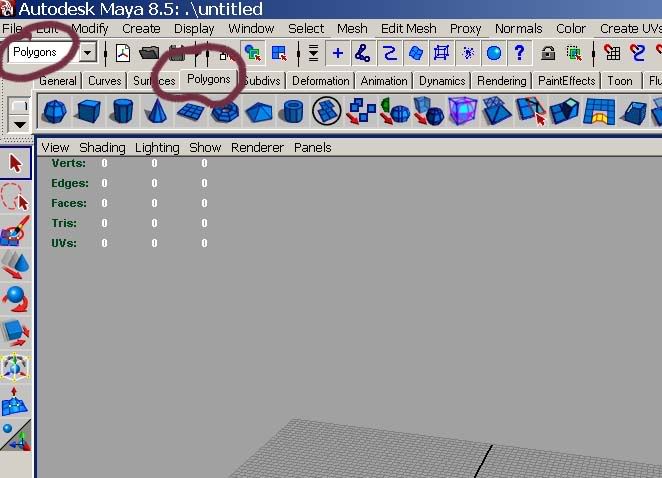
-Make your the top right of your thing looks like this:
-Polygons are in Games!
-Polygons are your friends!
-Sometimes your friends are jerks.
-A single point is called a vertex
-2 vertices are connected by an edge
-3 vertices connected by edges makes a tri
-Modellers are usually given tri limits
-Go display->Heads up display-> polycount to get your nifty polycount meter to track how much stuff you are using!
5. Making a rock
-Okay lets make a rock!
-Start off with a square!
-Click the make a square thing.
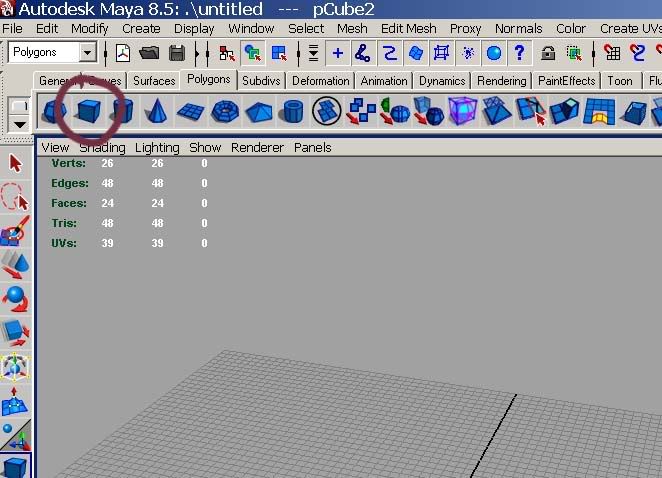
-Look to the right, it changes. These are the settings for the tool you are currently using!
-Change these values

-NOw your square will be divided when you make it.
-Click on the grid plane and drag out a flat thing. Release
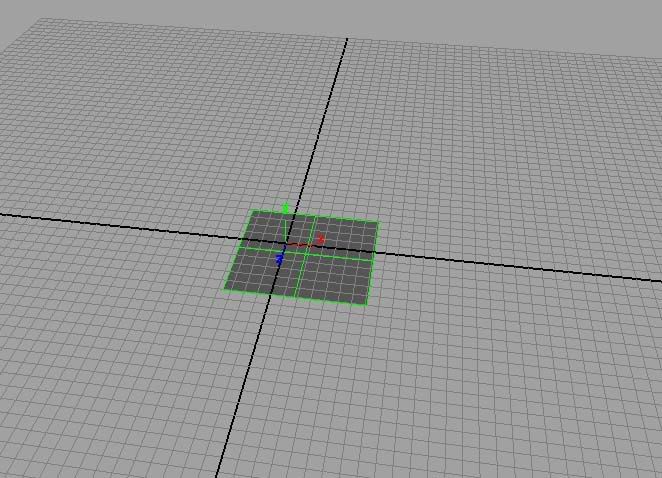
-Click down again and drag up to set height!
-Huzzah!
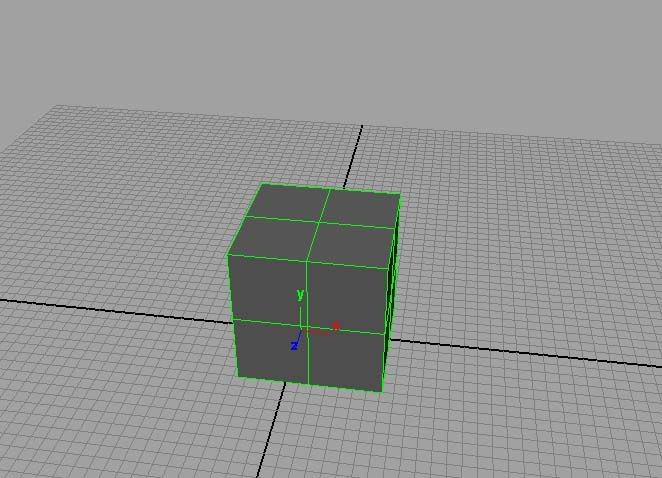
-now the edit stuff!
-Hover your mouse over the cube and hold down right click!
-This little menu is your bread and butter! KEEP HOLDING THE BUTTON DOWN
-Now drag your cursor over to vertex!
-Now let go!
-Now you can edit the vertices!
(going to edge, lets you move edges, going to faces lets you move faces, object is the whole thing. dont worry bout the other stuff.)
6. Now for your tools. They are on the left hand bar.
Starting from the 4th one going down they are:
move (w key)
rotate (e key)
scale (r key)
You can select a vertex, edge, face or object and apply any of these 3 transformations.
rotate and scale will do nothing to a single vertex.
But you can select multiple verts by holding down shift!
And then you can rotate and scale them!
its fun!
So just use the move tool.
Notice you get these 3D arrows. You can use these 3 handles to move your vertices around in 3D space.
So turn that cube into a rock now by moving the verts around. And save your file.
ANd thats the end of lesson 1
edit: I'll cover rendering in the next lesson. for now you can just print screen and show what you've got!
edit: and post your questions etc. Ill try n answer em.
edit edit: you can deselect your object by going right click menu-> object and then click on an empty space. So you can see your model without the wireframe.
Maya Lesson for Everyonedragonz(s)
1. Setup
-Use a wacom tablet, or your fingers will die.
-Set your pen buttons to right click and middle click
In Maya go:
-window->settings/preferences->preferences
Set it up this way:
Then click save!
2.OKay now set your project folder
-Make a new folder
-File->Project->Set
-Choose a folder
-this file will now always look in that folder for models and textures.
3.Camera Basics
-Space Bar Expands the current window your mouse is over. Spacebar again to go back.
-Alt+Press with pen (Left Click) rotates your view
-Alt+Right Click=zoome in and out
-Alt+Middle Click= pan
-press 5 to enter shaded mode, so that you arent looking at wireframes all the time. press 4 to return to
wireframe mode
4. Polygon Basics
-Make your the top right of your thing looks like this:
-Polygons are in Games!
-Polygons are your friends!
-Sometimes your friends are jerks.
-A single point is called a vertex
-2 vertices are connected by an edge
-3 vertices connected by edges makes a tri
-Modellers are usually given tri limits
-Go display->Heads up display-> polycount to get your nifty polycount meter to track how much stuff you are using!
5. Making a rock
-Okay lets make a rock!
-Start off with a square!
-Click the make a square thing.
-Look to the right, it changes. These are the settings for the tool you are currently using!
-Change these values
-NOw your square will be divided when you make it.
-Click on the grid plane and drag out a flat thing. Release
-Click down again and drag up to set height!
-Huzzah!
-now the edit stuff!
-Hover your mouse over the cube and hold down right click!
-This little menu is your bread and butter! KEEP HOLDING THE BUTTON DOWN
-Now drag your cursor over to vertex!
-Now let go!
-Now you can edit the vertices!
(going to edge, lets you move edges, going to faces lets you move faces, object is the whole thing. dont worry bout the other stuff.)
6. Now for your tools. They are on the left hand bar.
Starting from the 4th one going down they are:
move (w key)
rotate (e key)
scale (r key)
You can select a vertex, edge, face or object and apply any of these 3 transformations.
rotate and scale will do nothing to a single vertex.
But you can select multiple verts by holding down shift!
And then you can rotate and scale them!
its fun!
So just use the move tool.
Notice you get these 3D arrows. You can use these 3 handles to move your vertices around in 3D space.
So turn that cube into a rock now by moving the verts around. And save your file.
ANd thats the end of lesson 1
edit: I'll cover rendering in the next lesson. for now you can just print screen and show what you've got!
edit: and post your questions etc. Ill try n answer em.
edit edit: you can deselect your object by going right click menu-> object and then click on an empty space. So you can see your model without the wireframe.


artistjeffc.tumblr.com http://www.etsy.com/shop/artistjeffc
MagicToaster wrote:Uterus, do your thing!
PROX on
0
Posts
prox:
I'll go little more into the basics of the handles if you guys need, but stuff is better shown by the video tutorials that came with the program.
artistjeffc.tumblr.com http://www.etsy.com/shop/artistjeffc
Oh, it would be useful to also tell people what the shortcut keys are (i can't remember exactly as i haven't touched maya in years, something like f8-f11?) for switching between vertex, face, edge and normal mode are as it makes you able to manipulate things much quicker.
object/component toggle: F8
Vertices:F9
edges: F10
faces: F11
UVs: F12
we will deal with UVs later.
artistjeffc.tumblr.com http://www.etsy.com/shop/artistjeffc
Twitter
You can help by pointing out essentials that I've missed and perhaps other pertinent subjects...PROFFESSOR Bacon.
edit: I don't know a thing about rigging and skinning. maybe someone can teach that. then we can get animation going.
artistjeffc.tumblr.com http://www.etsy.com/shop/artistjeffc
maybe I can compress it and share?
The mere idea baffles me
3ds friend code: 2981-6032-4118
http://video.google.com/videoplay?docid=4637865106647172587&hl=en
I wanted to post it here and have it end up as higher resolution with sound, like me explaining what im doing as i do it.
Enjoy!
Maya
http://www.youtube.com/view_play_list?p=49FEA3CE3BCFAF69&page=1
and for 3dsmax
http://www.youtube.com/view_play_list?p=096E668B737CA6EA
These guys are grreat, they show you all about the programs and how to get around the UI's.
OOOOOOOOH MY GOOOOOOOOOURD I LUUUUURRRRVS YOU GUUUUUUUYSSSSS
Hahaha...I actually use a Wacom, and when I learned you needed 3 different mouse buttons for Maya...I went a little
But! I think it's okay. I just set the 2nd button on the pen to a "middle click", and now it's all good. We'll see how it goes. :P
Also i am so watching the 200 poly tutorial. i never got into the game development side of maya and it always intrigued me.
artistjeffc.tumblr.com http://www.etsy.com/shop/artistjeffc
Question: I started fiddling with things (hold Shift while making the cube, and it makes the entire object for you! whee!) and made a really big cube with lots of divisions. Then I made a face!
3ds friend code: 2981-6032-4118
Select your object
then
display->-polygons-> backface culling.
This makes polygons not double sided, and so you can not select a polygon unless it is facing you.
Good exploration ND. Remember to explore the program, and dont be afraid to experiment. Millions of way to do things in maya. And if you break it, just reinstall, because sometimes you can really screw up the program haha.
artistjeffc.tumblr.com http://www.etsy.com/shop/artistjeffc
artistjeffc.tumblr.com http://www.etsy.com/shop/artistjeffc
Shanks!
I was kind of hoping to show how things in Maya could be easy, before making it apparent that it can also be mind-bendingly hard.
I mean, I could cover basic stuff that will only get you so far, or I could go further and spend a month doing it and then writing it all down, or I could point a finger towards any of 100 auto-rigging scripts out there (what actual riggers do), which will let you cobble together an OK rig fairly quickly but you won't know how to fix anything if anything goes wrong. (And it will go wrong, oh yes, it will go wrong).
I'll cover it if people demand it, but since it's a semi-advanced kind of topic I'd rather not start there and scare everyone off.
And for your character demo- 200 polys is kind of low, you might want to make a higher res mesh, so you can demonstrate proper topology and edge flow, and show the benefits of work with quads over triangles. Not that a low-poly mesh with triangles is a bad thing, but scaling up to higher res meshes later on will be painful if someone gets in the habit of using tris to save poly count early on.
Twitter
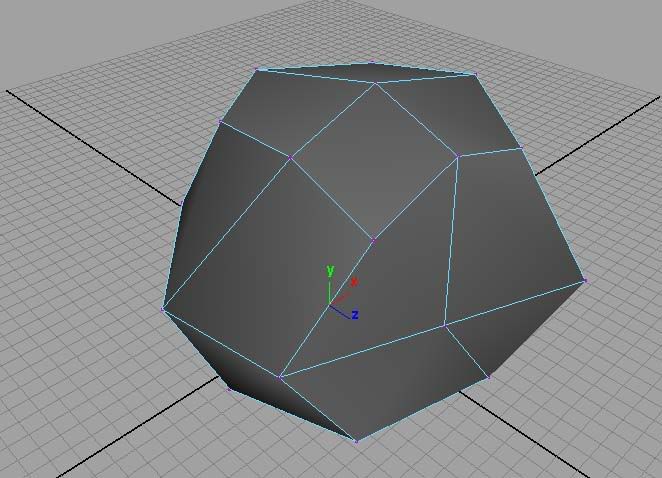
Good rocks ND!
edit: yeah we wont do rigging until people ask.
artistjeffc.tumblr.com http://www.etsy.com/shop/artistjeffc
artistjeffc.tumblr.com http://www.etsy.com/shop/artistjeffc
Twitter
The three axis
x
y
z
3D is defined by these 3 axises. These are the coordinates in space of everything.
So! familiarize yourself with the x y and z axis!
1.The Three Tabs.
"You mean you don't know how to use the 3 seashells?"
>1st buttons is the attributes tab
-you can use this to see and edit all the many attributes of the currently selected object
The current page can be used to rename your object where it says "mesh:"
Protip #1: It is a good habit to always label each of your objects. Heck, sometimes maya gets confused when things have similar names.
Protip #2: Save different versions of your models, so that you can always go to an earlier file if you totally screwed up.
>2nd button is the tools tab...which i didn't get a screen shot of...
-This tab lets you change the settings on the tool you are currently using
>3rd buttons is the channels tab
-oh man this tab is pretty crazy.
-There is the basic coordinate system there, where you can input precisely where you want stuff to be.
-it lets you change...history...like you can change what you did 3 steps ago and crap like that.
-but lets not get into that
-it also lets you create layers thats you can add objects to and turn them visible on and off and crap like that.
-we'll get to that later
-wtf this tab has more tabs inside of it.
2. Duplicate!
-you can go to edit->duplicate to duplicate an object!
-it will create an object right on top of the source one, so be sure to move it away.
-shortcut is control+d
-remember to rename when you duplicate or maya will be all "duuurrrr"
DUPLICATE SPECIAL
-uh oh
-go edit-> duplicate special->lil box
-any lil box opens up the settings for that command in a lil window you can mess around with
-copies are their own object.
-instances change when you change the source object. and arn't their own object.
-see the ones that are changing are instances
-the one that isnt changing is a copy
-also notice i put in a negative one in that box. this effectively makes a mirror copy along the x-axis.
-Duplicate special is very useful for testing out how multiple copies of an object will look laid out, without having to remodel each one by itself. Change one and it changes the rest
-Scale, Rotate, and move of the entire object do not effect the instances.
-So you can actually use the same mesh over and over again, squashing, resizing rotating and moving it all around.
3. HARD N SOFT EDGES
-Notice how some of your edges are sharp and some are soft, those are hard and soft edges
-Hard edges actually take up more 3D processing power than soft edge.
-Hard edges also make your model really blocky looking
-Most models are about 99% soft edges, because they let the textures do the talking.
-It is easier to hide your polygons with soft edges too.
check out the difference:
-that isnt to say hard edges arent used, just in the right places.
-so you can soften individual edges by selecting and edge and going normals->soften edge
-i just select my entire object and go->soften edge and pick out the hard edges i want.
-btw if you click this lil bar here when going to a menu item you can detach the menu (dont worry itll still be
there if you click the menu option again). Handy if your using a menu all the time.
artistjeffc.tumblr.com http://www.etsy.com/shop/artistjeffc
Where's everybody elses' rocks?
hmmm?
artistjeffc.tumblr.com http://www.etsy.com/shop/artistjeffc
Same. Also, I live in the bay area, and need somewhere to stay for pax.
We should date.
3ds friend code: 2981-6032-4118
People (ie ME) might want to use this thread as a resource in future.
3DConnexion SpaceNavigator PE
wonder if you can do without the keyboard & mouse completely with a wacom and that...
to get an idea in 3d applications
http://www.youtube.com/watch?v=4rPdU0xpQSM&feature=related
you can configure it to move your model around and not the camera i think, which would be pretty neat - but im a impulse gadget junkie so ...ignore this post
edit: he seems to be going a bit crazy with it near the end..
reading a few posts, apparently its useless...
Extremely good stuff, this inspired me to finally sit down and start learning a 3D modeling tool. Definitely keep it up!